Exported source
from fasthtml.common import *
import osThis guide will walk through a minimal example of working with a Stripe one-time payment link and webhook for secure reconciliation of payments.
To get started we can import the stripe library and authenticate with a Stripe API key that you can get from the stripe web UI.
from fasthtml.common import *
import osYou can install stripe python sdk directly from pypi:
pip install stripeAdditionally, you need to install the stripe cli. You can find how to install it on your specific system in their docs here
# uncomment and execute if needed
#!pip install stripeimport stripestripe.api_key = os.environ.get("STRIPE_SECRET_KEY")
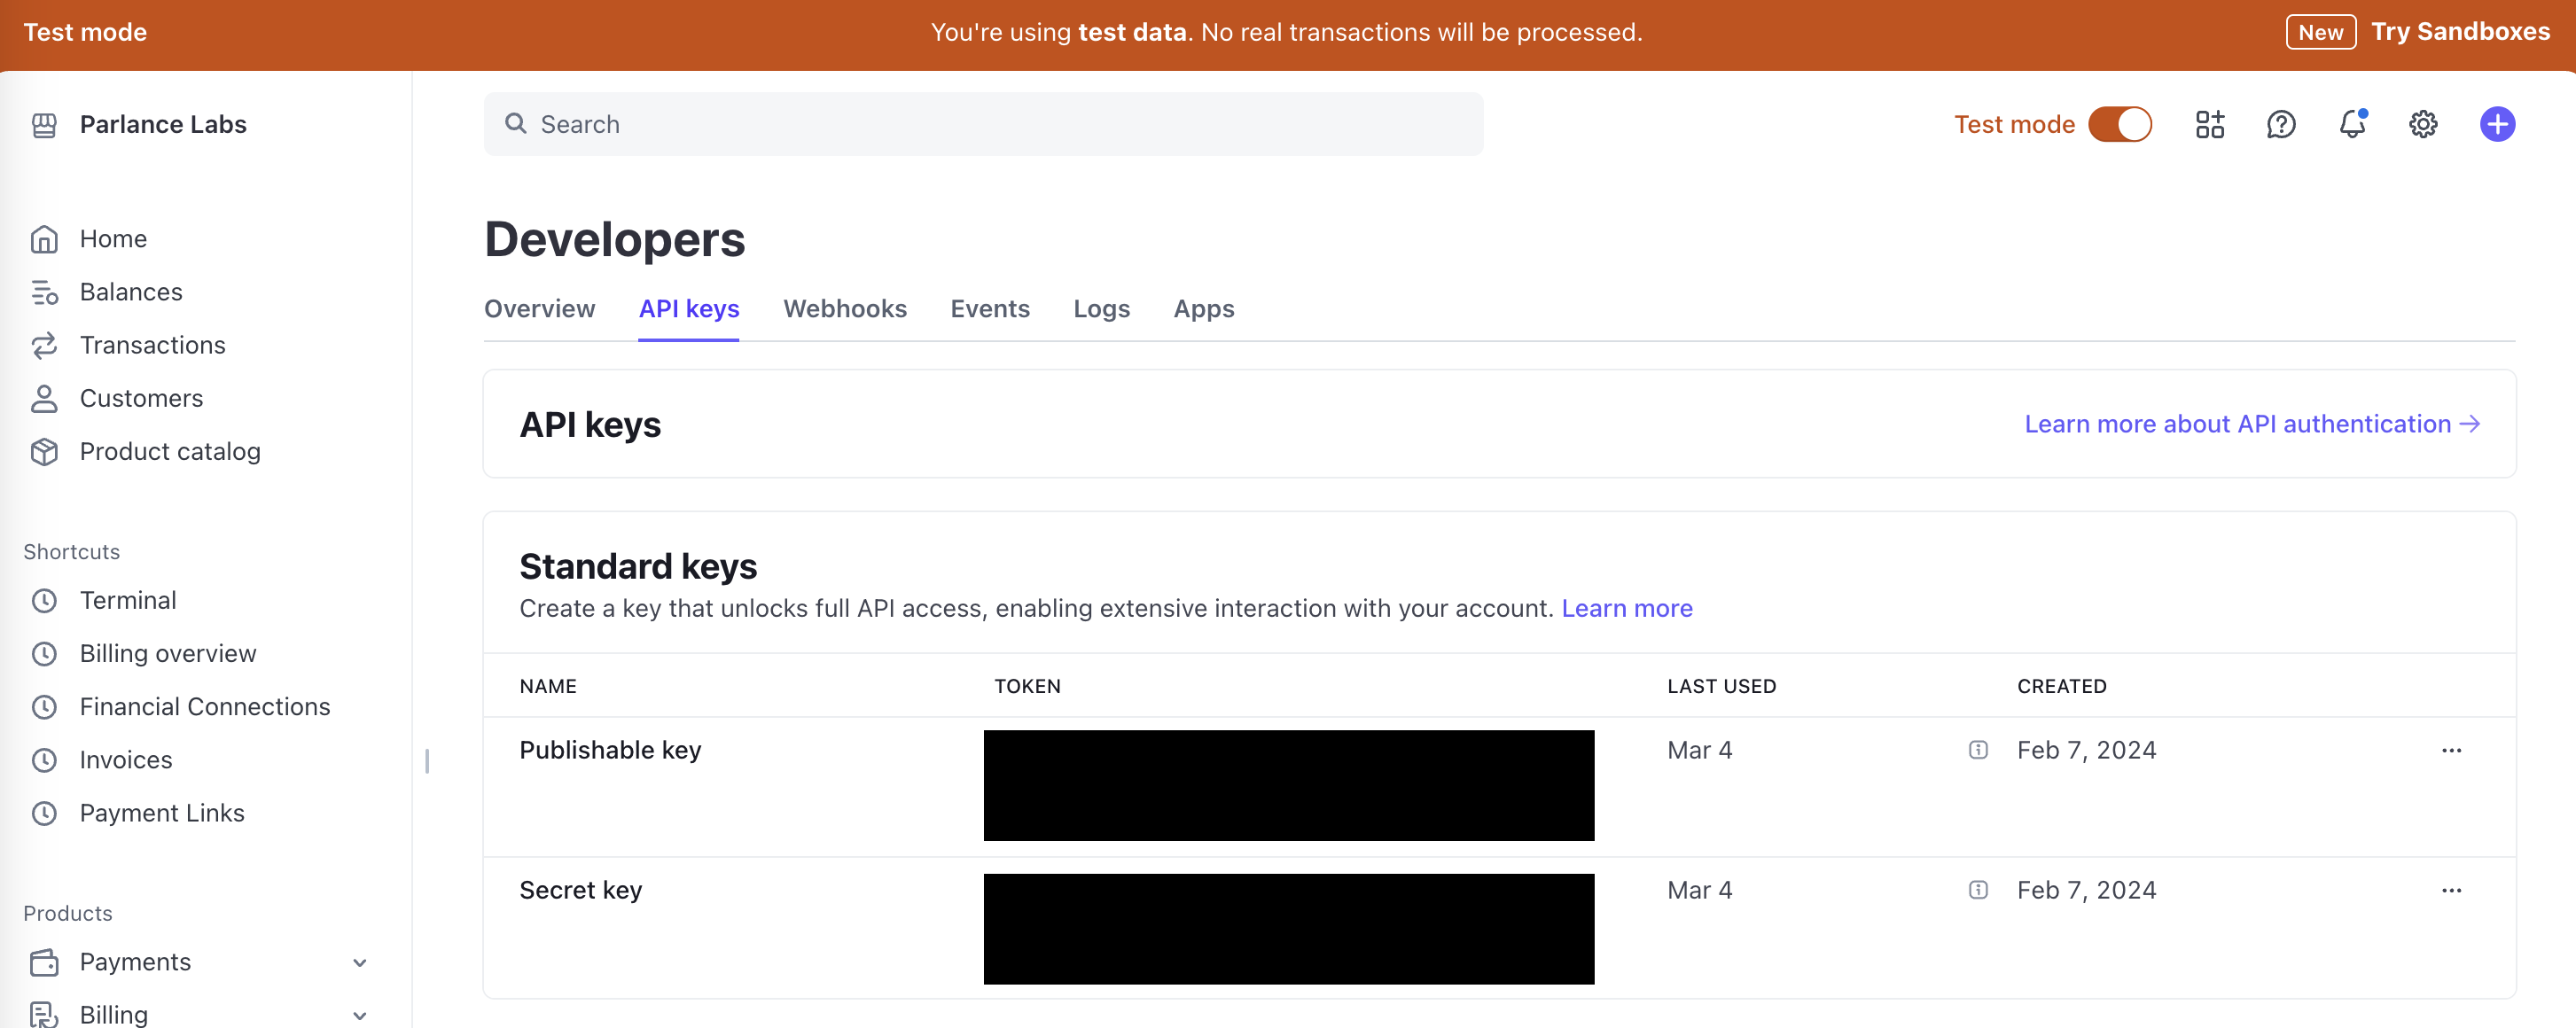
DOMAIN_URL = os.environ.get("DOMAIN_URL", "http://localhost:5001")You can get this API key from the Stripe Dashboard by going to this url.
Note: Make sure you have Test mode turned on in the dashboard.
Make sure you are using a test key for this tutorial
assert 'test_' in stripe.api_keyEverything in the pre-app setup sections is a run once and not to be included in your web-app.
You can run this to programatically create a Stripe Product with a Price. Typically, this is not something you do dynamically in your FastHTML app, but rather something you set up one time. You can also optionally do this on the Stripe Dashboard UI.
def _search_app(app_nm:str, limit=1):
    "Checks for product based on app_nm and returns the product if it exists"
    return stripe.Product.search(query=f"name:'{app_nm}' AND active:'True'", limit=limit).data

def create_price(app_nm:str, amt:int, currency="usd") -> list[stripe.Price]:
    "Create a product and bind it to a price object. If product already exist just return the price list."
    existing_product = _search_app(app_nm)
    if existing_product:
        return stripe.Price.list(product=existing_product[0].id).data
    else:
        product = stripe.Product.create(name=f"{app_nm}")
        return [stripe.Price.create(product=product.id, unit_amount=amt, currency=currency)]

def archive_price(app_nm:str):
    "Archive a price - useful for cleanup if testing."
    existing_products = _search_app(app_nm, limit=50)
    for product in existing_products:
        for price in stripe.Price.list(product=product.id).data:
            stripe.Price.modify(price.id, active=False)
stripe.Product.modify(product.id, active=False)To do recurring payment, you would use recurring={"interval": "year"} or recurring={"interval": "month"} when creating your stripe price.
app_nm = "[FastHTML Docs] Demo Product"
price_list = create_price(app_nm, amt=1999)
assert len(price_list) == 1, 'For this tutorial, we only have one price bound to our product.'
price = price_list[0]print(f"Price ID = {price.id}")Price ID = price_1R1ZzcFrdmWPkpOp9M28ykjyA webhook is simply a URL where your app listens for messages from Stripe. It provides a way for Stripe, the payment processor, to notify your application when something happens with a payment. Think of it like a delivery notification: when a customer completes a payment, Stripe needs to tell your application so you can update your records, send confirmation emails, or provide access to purchased content. It is simply a URL,
But your app needs to be sure every webhook event is actually coming from Stripe. That is, it needs to authenticate the notification. To do that, your app will need a webhook signing secret, which it uses to confirm that the notifications were signed by Stripe.
This secret is different from your Stripe API key. The Stripe API key lets you prove who you are to Stripe. The webhook signing secret lets you be sure messages from Stripe are coming from Stripe.
You will need a webhook signing secret whether your app is is running locally in test mode, or whether it is a real production app on running on a server. Here is how you get the webhook signing secret in these two cases.
When your application runs locally during development it can be reached only from your computer, so Stripe can’t make an HTTP request against the webhook. To workaround this in development, the Stripe CLI tool creates a secure tunnel which forwards these webhook notifications from Stripe’s servers to your local application.
Run this command to start that tunnel:
stripe listen --forward-to http://localhost:5001/webhookOn success, that command will also tell you the webhook signing secret. Take the secret it gives you and set it as an environment variable.
export STRIPE_LOCAL_TEST_WEBHOOK_SECRET=<your-secret>For a deployed app, you configure a permanent webhook connection in your Stripe Dashboard. This establishes an official notification channel where Stripe will send real-time updates about payments to your application’s /webhook URL.
On the dashboard, you can configure which specific payment event notifications will go to this webhook (e.g., completed checkouts, successful payments, failed payments, etc..). Your app provides the webhook signing secret to the Stripe library, to authenticate that these notifications come from the Stripe service. This is essential for production environments where your app needs to automatically respond to payment activities without manual intervention.
To configure the permanent webhook connection, you need to do the following steps:
Make sure you are in Test mode like before
Go to https://dashboard.stripe.com/test/webhooks
Click “+ Add endpoint” to create create a new webhook (or, if that is missing, click “Create an event destination”).
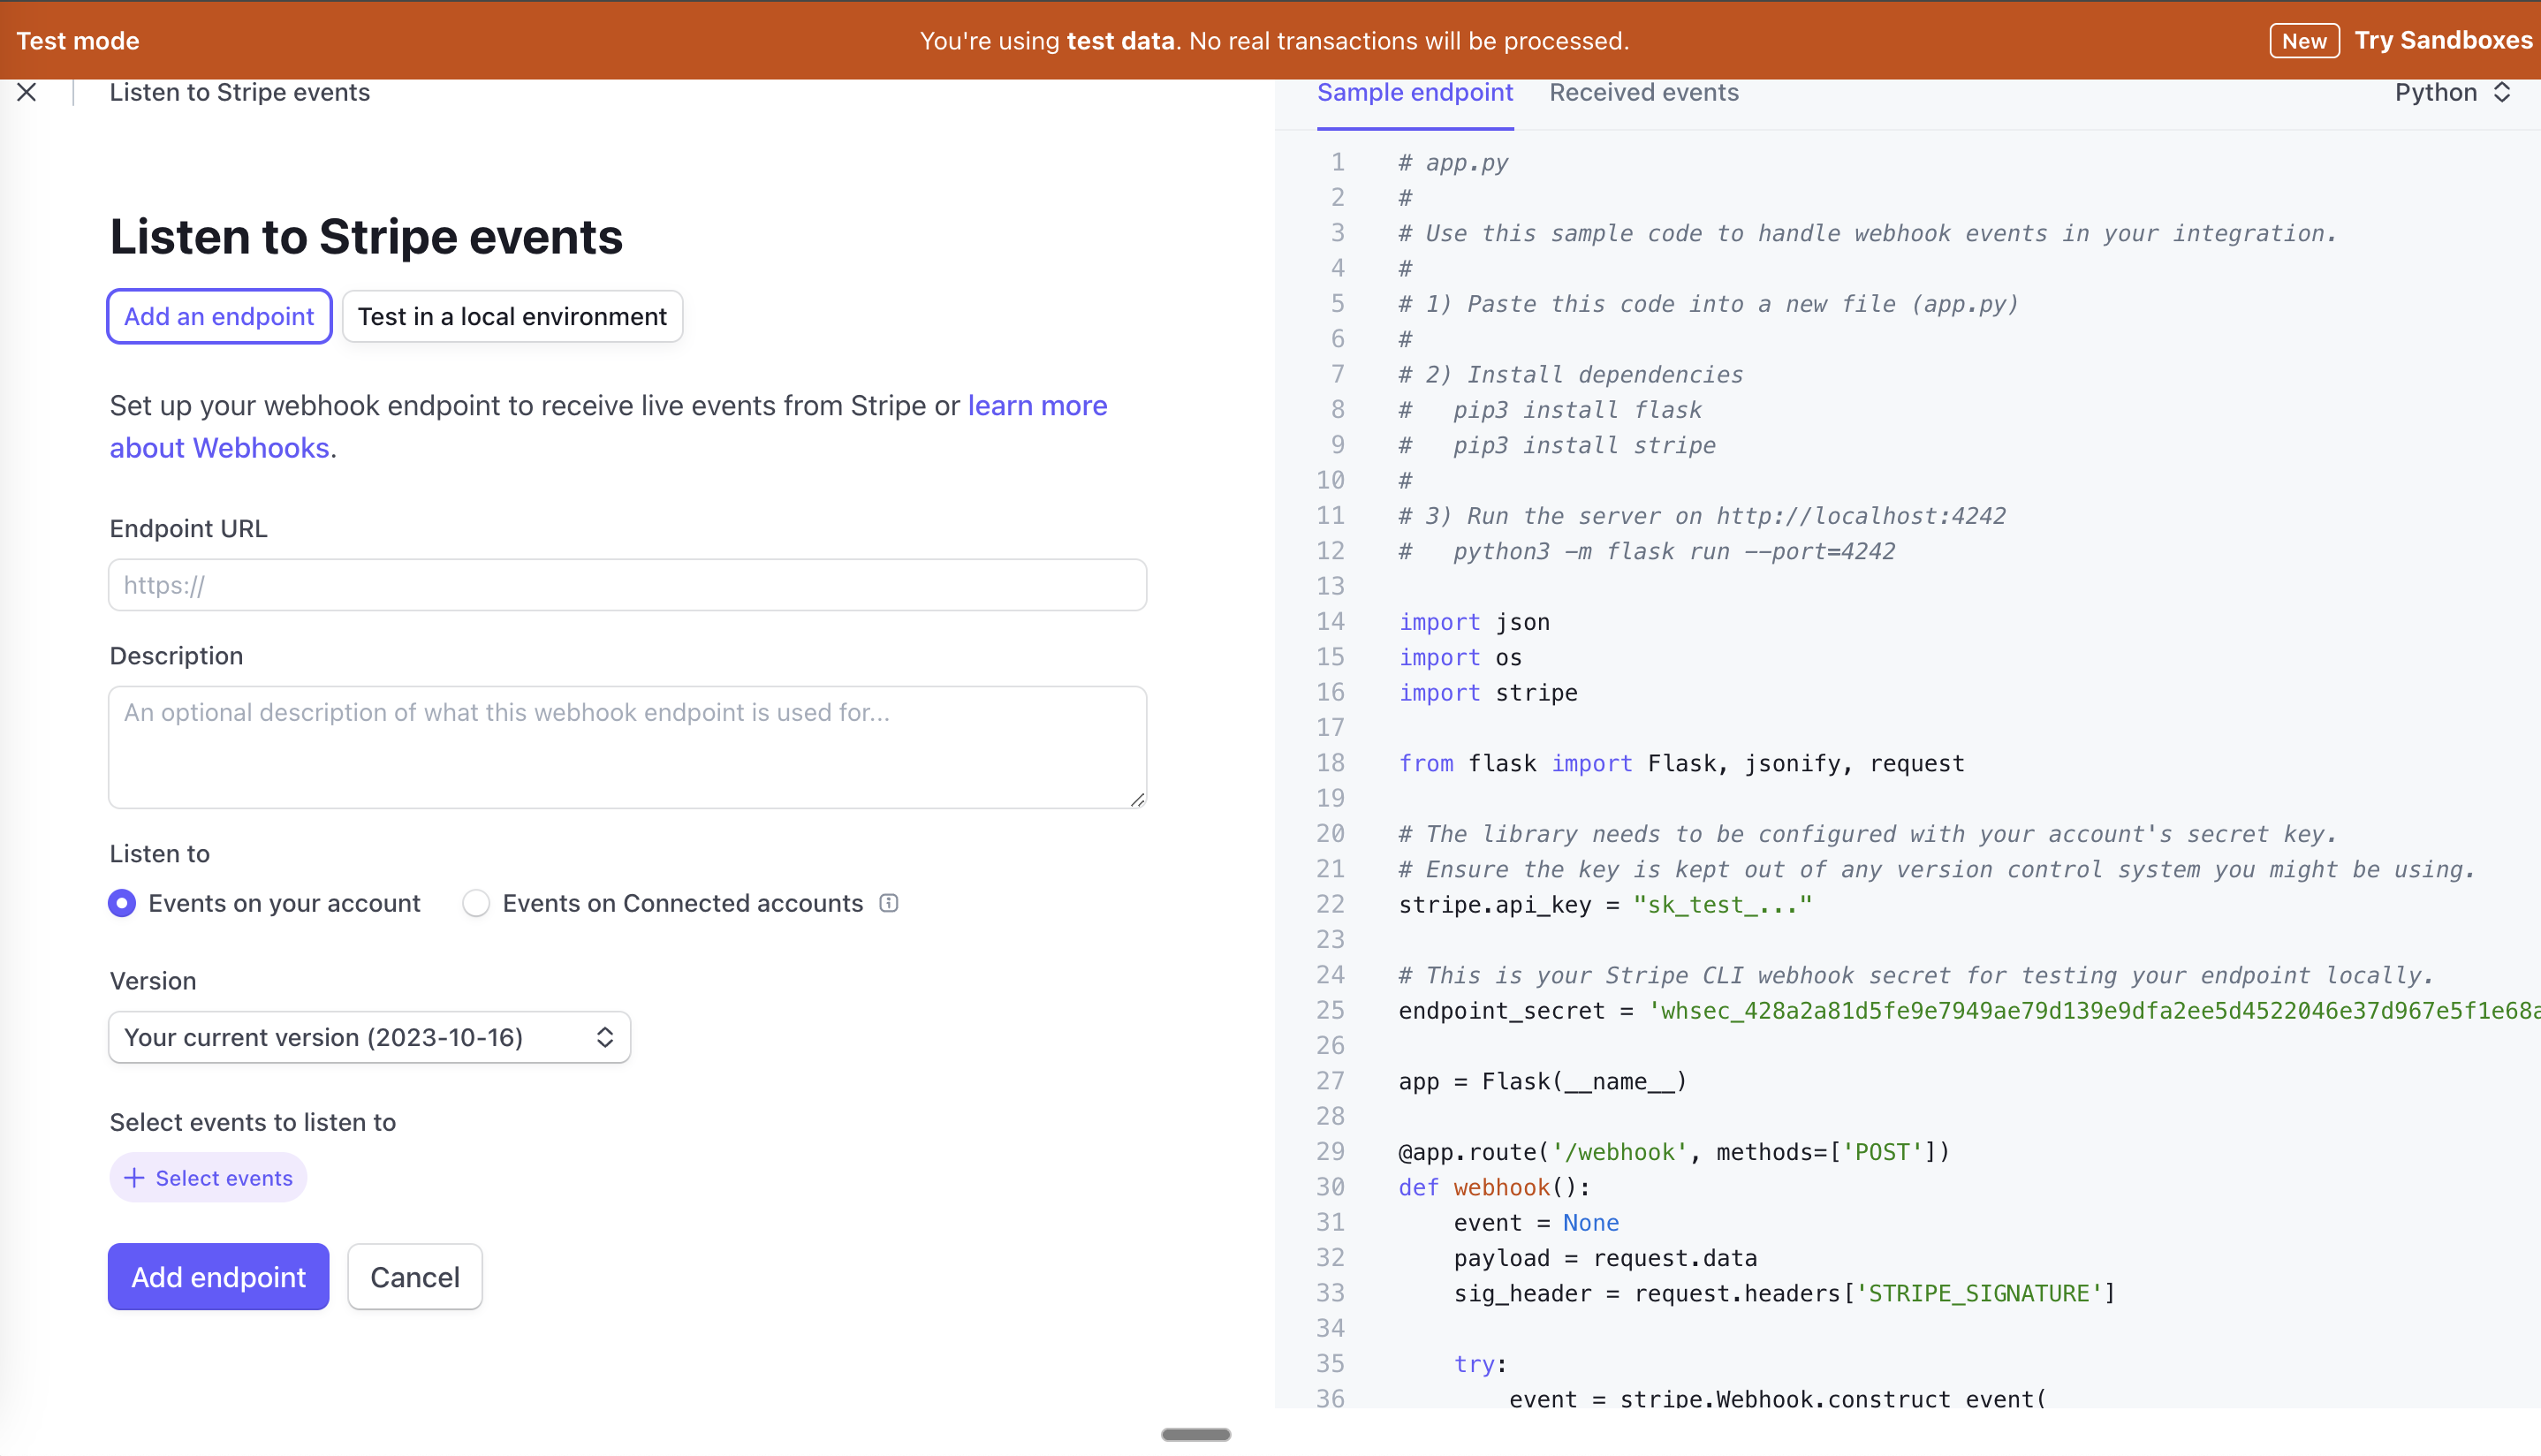
On the primary screen shown below, “Listen to Stripe events”, fill out the details. Your Endpoint URL will be https://YOURDOMAIN/webhook
Save your webhook signing scret. On the “Listen to Stripe events” screen, you can find it in the app sample code on the right hand side as the “endpoint secret”. You can also retrieve it later from the dashboard.
You also need to configure which events should generate webhook notifications:
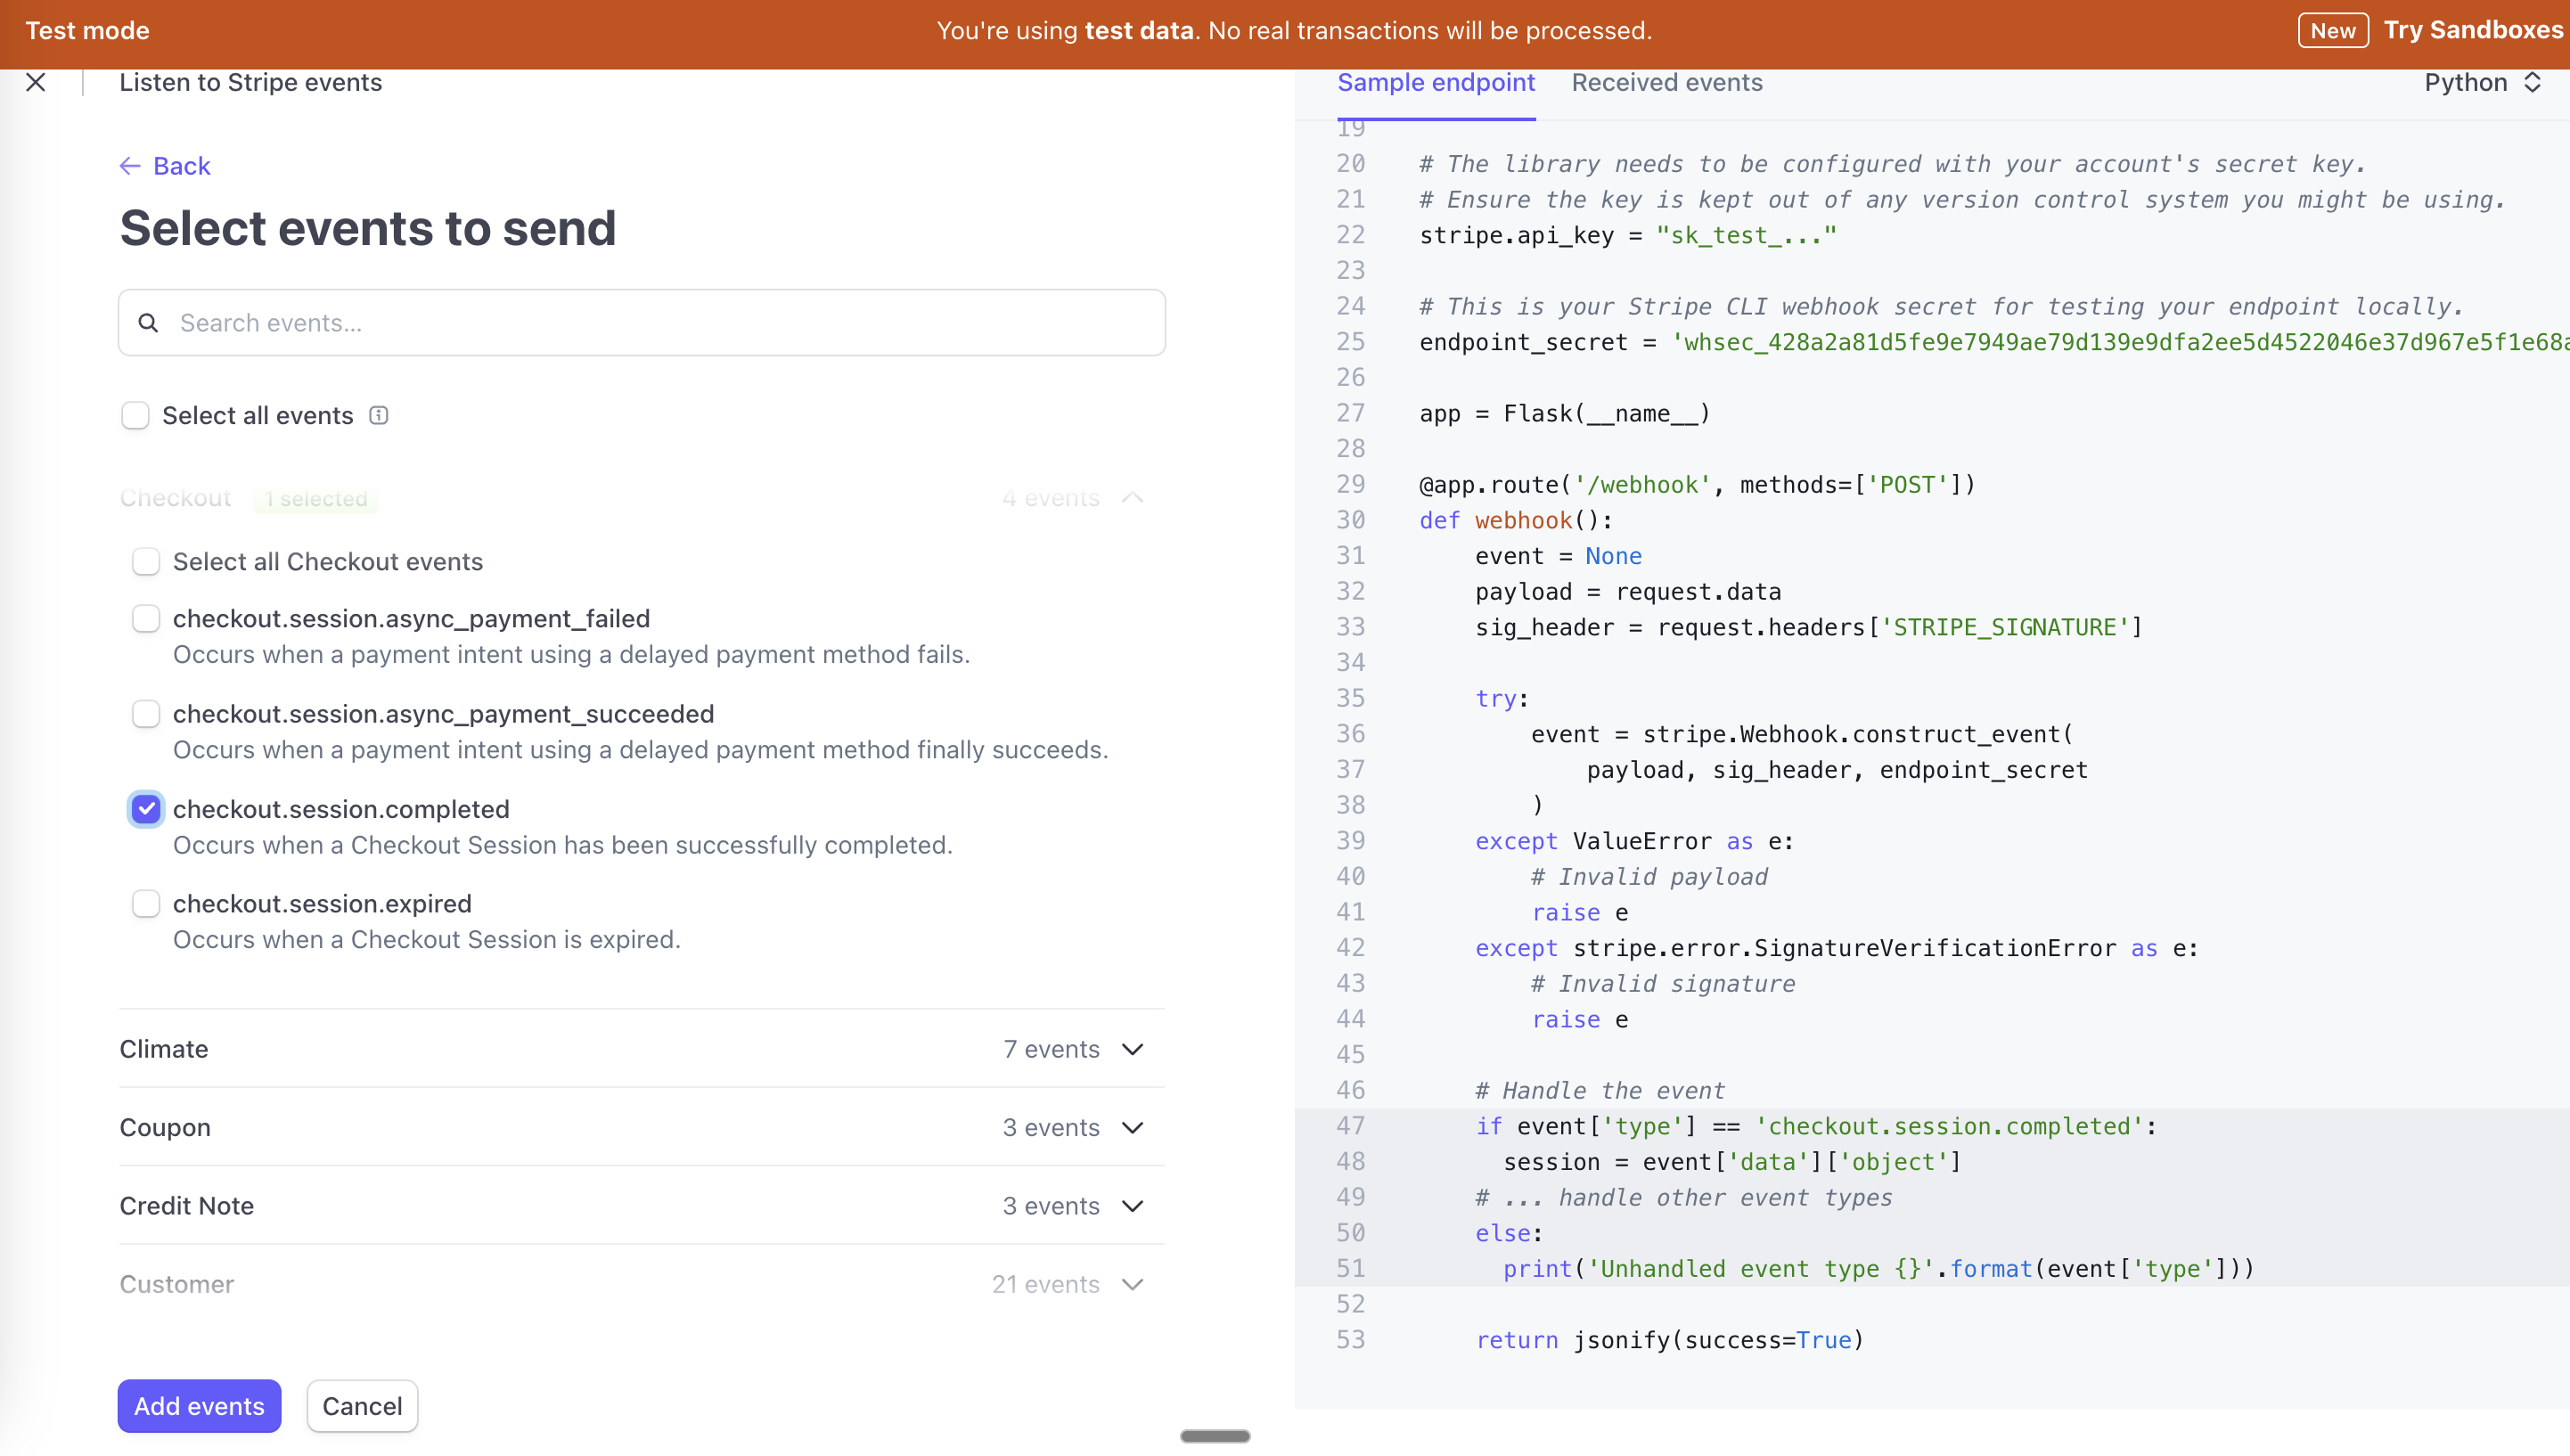
Click “+ Select events” to open the secondary control screen, “Select events to send”, which is shown below. In on our case we want to listen for checkout.session.completed.
Click the “Add Events” button, to confirm which events to send.
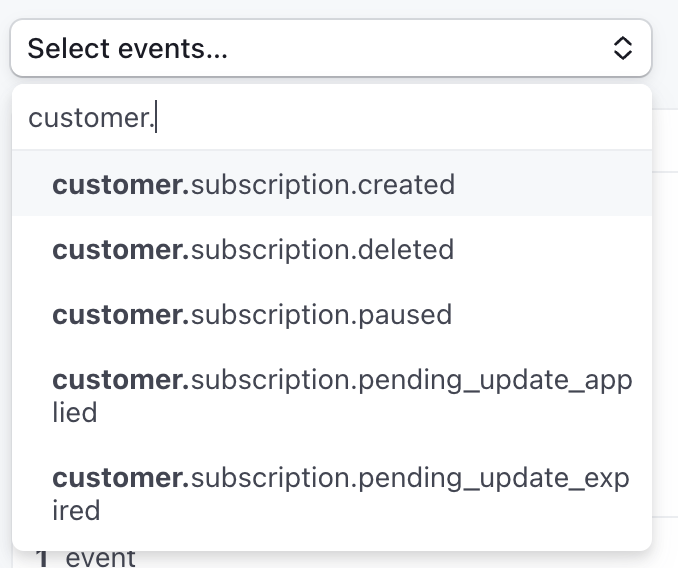
For subscriptions you may also want to enable additional events for your webhook such as: customer.subscription.created, customer.subscription.deleted, and others based on your use-case.
Finally, click “Add Endpoint”, to finish configuring the endpoint.
Everything after this point is going to be included in your actual application. The application created in this tutorial can be found here
In order to accept a payment, you need to know who is making the payment.
There are many ways to accomplish this, for example using oauth or a form. For this example we will start by hardcoding an email address into a session to simulate what it would look like with oauth.
We save the email address into the session object, under the key auth. By putting this logic into beforeware, which runs before every request is processed, we ensure that every route handler will be able to read that address from the session object.
def before(sess): sess['auth'] = 'hamel@hamel.com'
bware = Beforeware(before, skip=['/webhook'])
app, rt = fast_app(before=bware)
We will need our webhook secret that was created. For this tutorial, we will be using the local development environment variable that was created above. For your deployed production environment, you will need to get the secret for your webhook from the Stripe Dashboard.
WEBHOOK_SECRET = os.getenv("STRIPE_LOCAL_TEST_WEBHOOK_SECRET")We need 2 things first:
@rt("/")
def home(sess):
    auth = sess['auth']
    return Titled(
        "Buy Now",
        Div(H2("Demo Product - $19.99"),
            P(f"Welcome, {auth}"),
            Button("Buy Now", hx_post="/create-checkout-session", hx_swap="none"),
            A("View Account", href="/account")))
We are only allowing card payments (payment_method_types=['card']). For additional options see the Stripe docs.
@rt("/create-checkout-session", methods=["POST"])
async def create_checkout_session(sess):
    checkout_session = stripe.checkout.Session.create(
        line_items=[{'price': price.id, 'quantity': 1}],
        mode='payment',
        payment_method_types=['card'],
        customer_email=sess['auth'],
        metadata={'app_name': app_nm,
                  'AnyOther': 'Metadata',},
        # CHECKOUT_SESSION_ID is a special variable Stripe fills in for you
        success_url=DOMAIN_URL + '/success?checkout_sid={CHECKOUT_SESSION_ID}',
        cancel_url=DOMAIN_URL + '/cancel')
return Redirect(checkout_session.url)For subscriptions the mode would typically be subscription instead of payment
This section creates two key components: a simple webpage with a “Buy Now” button, and a function that handles what happens when that button is clicked.
When a customer clicks “Buy Now,” the app creates a Stripe checkout session (essentially a payment page) with product details, price, and customer information. Stripe then takes over the payment process, showing the customer a secure payment form. After payment is completed or canceled, Stripe redirects the customer back to your app using the success or cancel URLs you specified. This approach keeps sensitive payment details off your server, as Stripe handles the actual transaction.
After a customer initiates payment, there are two parallel processes:
User Experience Flow: The customer is redirected to Stripe’s checkout page, completes payment, and is then redirected back to your application (either the success or cancel page).
Backend Processing Flow: Stripe sends webhook notifications to your server about payment events, allowing your application to update records, provision access, or trigger other business logic.
This dual-track approach ensures both a smooth user experience and reliable payment processing.
The webhook notification is critical as it’s a reliable way to confirm payment completion.
Create a database schema with the information you’d like to store.
# Database Table
class Payment:
    checkout_session_id: str  # Stripe checkout session ID (primary key)
    email: str
    amount: int  # Amount paid in cents
    payment_status: str  # paid, pending, failed
    created_at: int # Unix timestamp
    metadata: str  # Additional payment metadata as JSON
Connect to the database
db = Database("stripe_payments.db")
payments = db.create(Payment, pk='checkout_session_id', transform=True)
In our webhook we can execute any business logic and database updating we need to.
@rt("/webhook")
async def post(req):
    payload = await req.body()
    # Verify the event came from Stripe
    try:
        event = stripe.Webhook.construct_event(
            payload, req.headers.get("stripe-signature"), WEBHOOK_SECRET)
    except Exception as e:
        print(f"Webhook error: {e}")
        return
    if event and event.type == "checkout.session.completed":
        event_data = event.data.object
        if event_data.metadata.get('app_name') == app_nm:
            payment = Payment(
                checkout_session_id=event_data.id,
                email=event_data.customer_email,
                amount=event_data.amount_total,
                payment_status=event_data.payment_status,
                created_at=event_data.created,
                metadata=str(event_data.metadata))
            payments.insert(payment)
            print(f"Payment recorded for user: {event_data.customer_email}")

    # Do not worry about refunds yet, we will cover how to do this later in the tutorial
    elif event and event.type == "charge.refunded":
        event_data = event.data.object
        payment_intent_id = event_data.payment_intent
        sessions = stripe.checkout.Session.list(payment_intent=payment_intent_id)
        if sessions and sessions.data:
            checkout_sid = sessions.data[0].id
            payments.update(Payment(checkout_session_id= checkout_sid, payment_status="refunded"))
            print(f"Refund recorded for payment: {checkout_sid}")
The webhook route is where Stripe sends automated notifications about payment events. When a payment is completed, Stripe sends a secure notification to this endpoint. The code verifies this notification is legitimate using the webhook secret, then processes the event data - extracting information like the customer’s email and payment status. This allows your application to automatically update user accounts, trigger fulfillment processes, or record transaction details without manual intervention.
Note that in this route, our code extracts the user’s email address from the Stripe event, not from the session object. That is the because this route will be hit by a request from Stripe’s servers, not from the user’s browser.
When doing a subscription, often you would add additional event types in an if statement to update your database appropriately with the subscription status.
if event.type == "payment_intent.succeeded":
    ...
elif event.type == "customer.subscription.created":
    ...
elif event.type == "customer.subscription.deleted":
...The /success route is where Stripe will redirect the user after the payment completes successfully, which will also be after Stripe has called the webhook to inform your app of the transaction.
Stripe knows to send the user here, because you provided Stripe with this route when you created a checkout session.
But you want to verify this is the case. So in this route, you should verify the user’s payment status, by checking your database for the entry which your app saved when it received that webhook notification.
@rt("/success")
def success(sess, checkout_sid:str):
    # Get payment record from database (saved in the webhook)
    payment = payments[checkout_sid]

    if not payment or payment.payment_status != 'paid':
        return Titled("Error", P("Payment not found"))

    return Titled(
        "Success",
        Div(H2("Payment Successful!"),
            P(f"Thank you for your purchase, {sess['auth']}"),
            P(f"Amount Paid: ${payment.amount / 100:.2f}"),
            P(f"Status: {payment.payment_status}"),
            P(f"Transaction ID: {payment.checkout_session_id}"),
            A("Back to Home", href="/")))
There is also a /cancel route, where Stripe will redirect the user if they canceled the checkout.
@rt("/cancel")
def cancel():
    return Titled(
        "Cancelled",
        Div(H2("Payment Cancelled"),
            P("Your payment was cancelled."),
            A("Back to Home", href="/")))
This image shows Stripe’s payment page that customers see after clicking the “Buy Now” button. When your app redirects to the Stripe checkout URL, Stripe displays this secure payment form where customers enter their card details. For testing purposes, you can use Stripe’s test card number (4242 4242 4242 4242) with any future expiration date and any 3-digit CVC code. This test card will successfully process payments in test mode without charging real money. The form shows the product name and price that were configured in your Stripe session, providing a seamless transition from your app to the payment processor and back again after completion.

Once you have processed the payments you can see each record in the sqlite database that was stored in the webhook.
Next, we can see how to add the refund route
In order to use a refund capability we need an account management page where users can request refunds for their payments.
When you initiate a refund, you can see the status of the refund in your Stripe dasbhoard at https://dashboard.stripe.com/payments, or https://dashboard.stripe.com/test/payments if you are in Test mode
It will look like this with a Refunded icon:
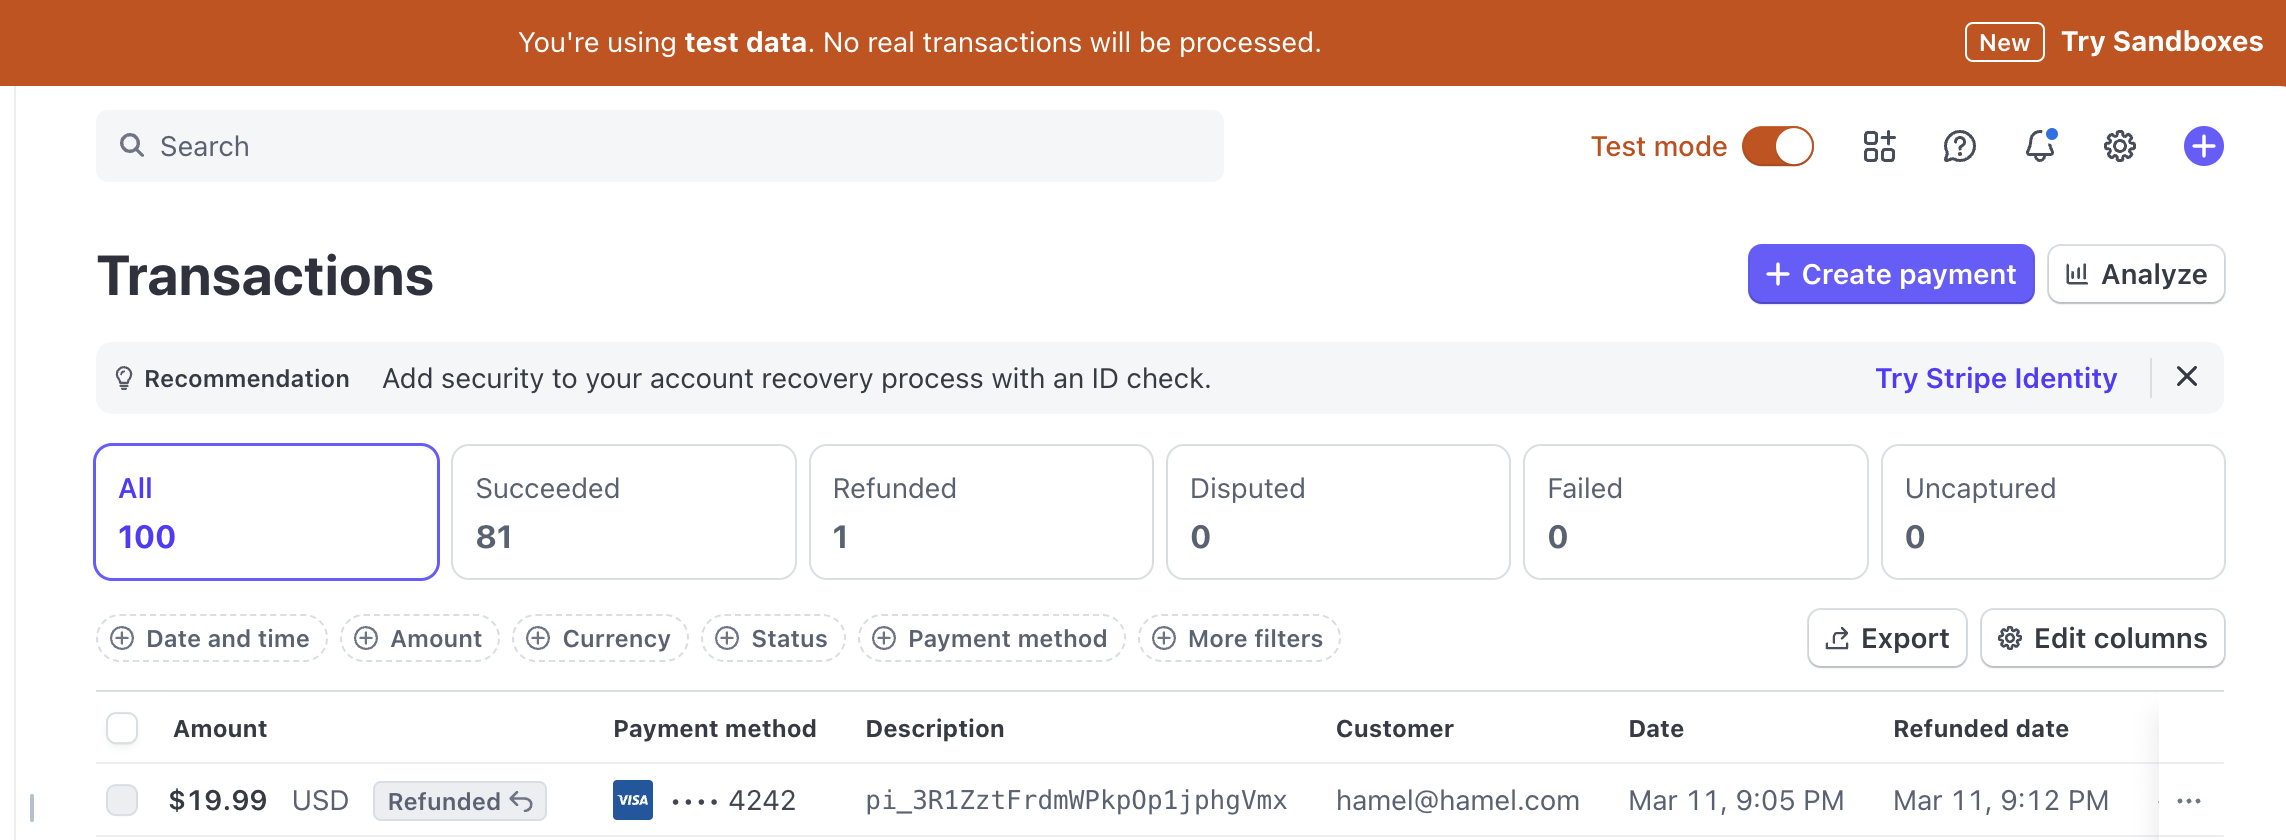
In this tutorial, we learned how to implement and test a complete Stripe payment flow including:
When migrating this payment system to production, you’ll need to create actual products, prices and webhooks in your Stripe dashboard rather than test ones. You’ll also need to replace your test API keys with live Stripe API keys.